Using minikube with nip.io on WSL2
Minikube combined with nip.io makes accessing and developing applications a breeze.

Prerequisites
- A working Windows PC with WSL2 set up (https://learn.microsoft.com/en-us/windows/wsl/install)
- A terminal to work with the WSL2 environment. I strongly recommend using Visual Studio Code for this. (https://code.visualstudio.com/blogs/2019/09/03/wsl2)
kubectlbinary installed (https://kubernetes.io/docs/tasks/tools/)
Goal of this guide
We want to be able to access an application that is running in a Kubernetes cluster through a browser. Sounds simple, doesn't it? But the Kubernetes cluster is virtualised with minikube and running in WSL2 using Docker Desktop, which runs on Windows. The browser is used from the machine running Windows. We will use nip.io to provide a domain name to resolve the application in the browser.
What is minikube?
Minikube is a lightweight Kubernetes (K8s) implementation that allows you to run a single-node Kubernetes cluster locally on your computer. It's designed for developers who want to test or develop Kubernetes applications without needing a full-scale Kubernetes environment.
What is nip.io?
Nip.io is a wildcard DNS service that provides an easy way to create custom domain names for applications running locally or in dynamic environments, without the need for manual DNS configuration. It automatically resolves domain names based on the IP address embedded in the URL. For example, a domain such as app.192.168.1.10.nip.io would resolve to the IP address 192.168.1.10.
Step 1: Install minikube
As mentioned above, I use Ubuntu as my operating system in WSL2. So installing minikube is a simple matter of using dpkg:
curl -LO https://storage.googleapis.com/minikube/releases/latest/minikube_latest_amd64.deb
sudo dpkg -i minikube_latest_amd64.debStep 2: Create the Kubernetes cluster with minikube
Next, we create a small Kubernetes cluster using minikube.
minikube start--kubernetes-version flag if you want to specify a Kubernetes version for your cluster.Make sure that the cluster is up and running:
kubectl get nodes

NAME       STATUS   ROLES           AGE   VERSION
minikube   Ready    control-plane   59m   v1.26.3
Step 3: Enable the Ingress Controller
To access the application with a domain name through a browser, we will need a working Ingress Controller running in Kubernetes. Fortunately, minikube has an easy way to install such a controller. The NGINX Ingress Controller can be enabled with the following command:
minikube addons enable ingressCheck that the NGINX Ingress Controller is running:
kubectl get pods -n ingress-nginx

NAME                                        READY   STATUS      RESTARTS   AGE
ingress-nginx-admission-create-2jpkf        0/1     Completed   0          57s
ingress-nginx-admission-patch-hwwcm         0/1     Completed   0          57s
ingress-nginx-controller-6cc5ccb977-8kxsl   1/1     Running     0          57s
Once all the Pods have started up - which can take up to a minute - you can continue.
Step 4: Deploy a demo application
For the sake of simplicity, we will deploy a simple Hello World application:
kubectl create deployment hello --image=gcr.io/google-samples/hello-app:1.0Verify that the deployment is ready:
kubectl get deployment hello

NAME     READY   UP-TO-DATE   AVAILABLE   AGE
hello    1/1     1            1           53s
The next command will create a service for this deployment:
kubectl expose deployment hello --port=8080Let's make sure it worked:
kubectl get svc

NAME         TYPE        CLUSTER-IP      EXTERNAL-IP   PORT(S)    AGE
hello        ClusterIP   10.105.255.15   <none>        8080/TCP   5m12s
Now we can expose the service by using an Ingress. It's time for nip.io to enter the room. We will use this service to resolve the custom domain name to our local machine. I will use hello.127.0.0.1.nip.io as the host. Feel free to choose another, but make sure you use 127.0.0.1.nip.io as the suffix, as this will make nip.io resolve to the local machine - 127.0.0.1 is a special ip address and always points to the localhost.
apiVersion: networking.k8s.io/v1
kind: Ingress
metadata:
  name: hello
spec:
  rules:
    - host: hello.127.0.0.1.nip.io
      http:
        paths:
          - path: /
            pathType: Prefix
            backend:
              service:
                name: hello
                port:
                  number: 8080
Make sure that the Ingress has been created:
kubectl get ingress
NAME      CLASS   HOSTS                      ADDRESS          PORTS   AGE
hello     nginx   hello.127.0.0.1.nip.io     <your_ip_here>   80      5m45s
After a few seconds, the Ingress record get an ip address. But the ip address shown in this output <your_ip_here> is only the ip address of the container that is running minikube. It can't be used to access the application. In the next step I'll show you how to do this.
Step 5: Access the application
The easiest way to access the application is to use the minikube service command:
minikube service helloThis will open a tunnel for that service and open the application with the browser. So far, so good. However, this approach is quite limited. For example, you can't use HTTPS with this approach. Let's take a look at a better approach.
We can use the minikube tunnel command to open a permanent tunnel for all defined Ingress resources:
minikube tunnel
✅  Tunnel successfully started

📌  NOTE: Please do not close this terminal as this process must stay alive for the tunnel to be accessible ...
Now go to your browser and open hello.127.0.0.1.nip.io.
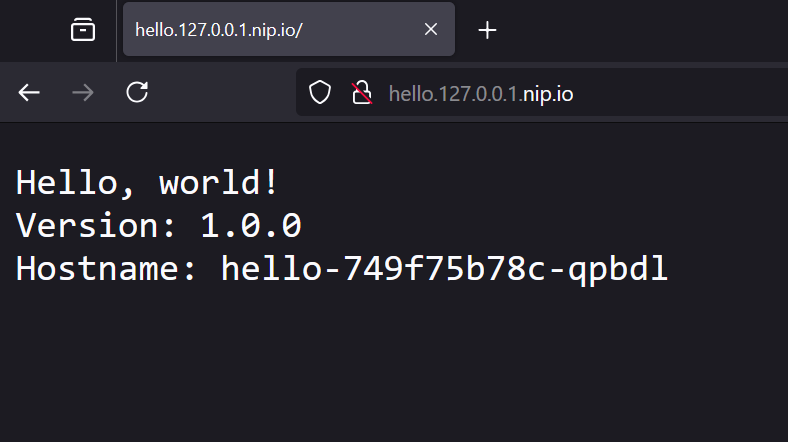
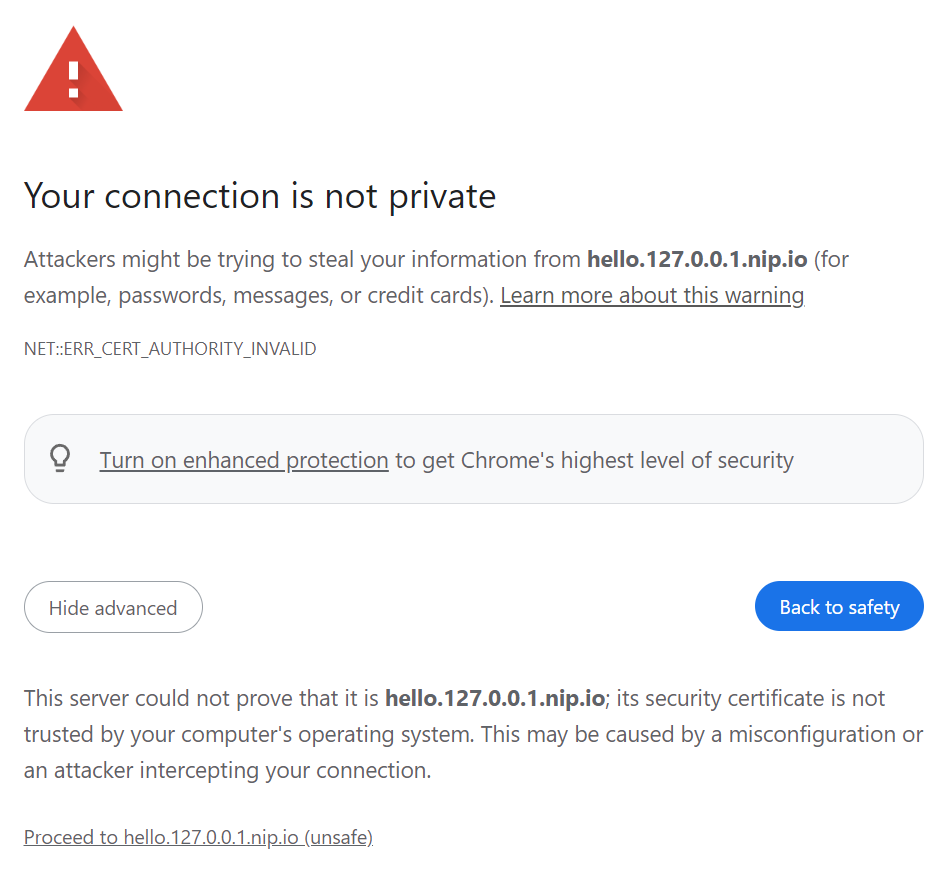
Make sure you use HTTP as the protocol. HTTPS will return an error because the NGINX Ingress Controller uses self-signed certificates.
Conclusion
This guide has shown you how to access applications running in a minikube-based Kubernetes cluster inside WSL2 by using the minikube tunnel command. The nip.io DNS service can be used to resolve custom domains to this tunnel. Any Ingress resource that uses a host with the suffix 127.0.0.1.nip.io will be reachable from your local Windows machine.