Using GitHub as a Helm Chart Repository
Using GitHub Pages to create a Helm Repository in a secure and stable way.

In this guide, I'll show you how to set up a Helm Chart Repository in less than 10 minutes using GitHub Pages and GitHub Action Workflows.
Step 1: Create a new Git repository
To get started, you just need to create a new Git repository on GitHub. You can name it whatever you like, but it's become standard practice to name it helm-charts.

Just make sure you make the repository public and choose a license like MIT or something similar. If you want to create a private repository, you'll need to upgrade your account to use it as a Helm repository.
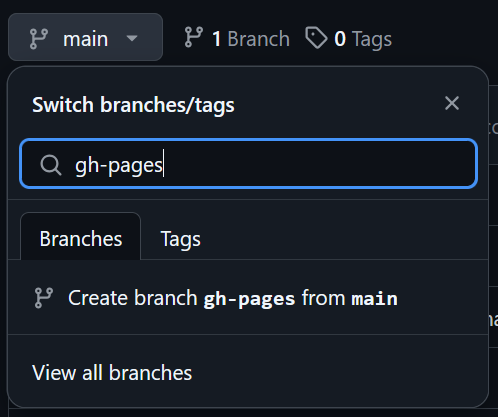
Step 2: Create a new branch gh-pages
The simplest way to create a new branch is to click on the main branch in the main window and type in the new branch name, which in this case is gh-pages. You should then see a message saying 'Create branch gh-pages from main'. Click on it.
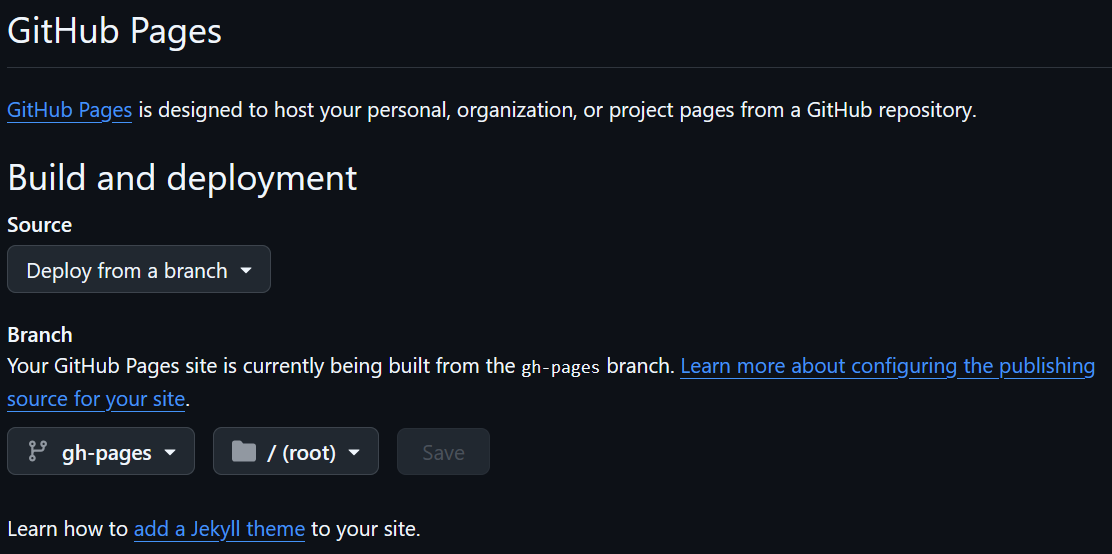
Step 3: Define GitHub Pages branch
Head to Settings > Code and automation > Pages. If your gh-pages branch isn't already selected in the dropdown, just choose it and set it to the root (/) folder.
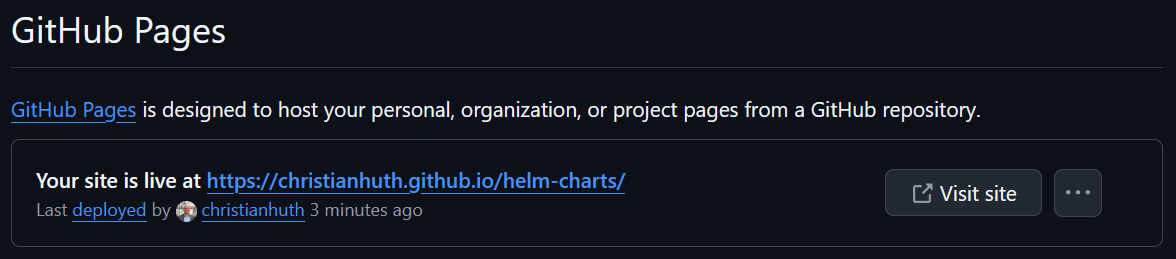
So, we've got everything set up for GitHub Pages. After a couple of minutes, you'll see the following information at the top of the GitHub Pages settings, which tells us that the site is now live.
Step 4: Create a GitHub Actions Workflow
Finally, we need to create a GitHub Actions Workflow that packages the Helm Chart and publishes it through GitHub Pages. To do this, we create a file called .github/workflows/release.yaml on the main branch of the Git repository with the following content:
name: Release Charts

on:
  push:
    branches:
      - main

jobs:
  release:
    permissions:
      contents: write
    runs-on: ubuntu-latest
    steps:
      - name: Checkout
        uses: actions/checkout@v4
        with:
          fetch-depth: 0

      - name: Configure Git
        run: |
          git config user.name "$GITHUB_ACTOR"
          git config user.email "$GITHUB_ACTOR@users.noreply.github.com"

      - name: Run chart-releaser
        uses: helm/chart-releaser-action@v1.6.0
        env:
          CR_TOKEN: "${{ secrets.GITHUB_TOKEN }}"
The above configuration uses the Helm Chart Releaser Action to turn your GitHub project into a self-hosted Helm chart repo. Every change you make to your Helm Charts - which you should store in a subfolder of a folder called charts - will now result in a new release being packaged and hosted on GitHub Pages. The workflow also takes care of creating or updating an index.yaml file with metadata about those releases.
Your Git repository should be looking something like this now:
|-- .github
|   -- workflows
|       -- release.yaml
|-- charts
|   -- your-helm-chart
|       -- templates
|       -- Chart.yaml
|       -- LICENSE
|       -- values.yaml
|-- .gitignore
|-- LICENSE
Bonus: Use a custom domain
GitHub Pages URL are usually named like this: <GITHUB_USERNAME>.github.io/<REPOSITORY_NAME>. If you want to use your own domain, like charts.christianhuth.de, it's pretty easy to do.
To get started, go back to Settings > Code and automation > Pages. You'll see a section called Custom domain. Enter your desired domain there and click Save.

GitHub then runs a DNS check, which will show an error, because your custom domain isn't resolving correctly. Next, go to your DNS provider and add a CNAME record that points to your default GitHub URL. For example, if your GitHub username is christianhuth, your CNAME record should be christianhuth.github.io.
After adding the DNS entry and waiting a couple of minutes for the DNS propagation to complete, the DNS check should turn green. You can then start using the custom domain to access your Helm repository hosted on GitHub using GitHub Pages.
Conclusion
GitHub Pages in combination with the GitHub Releaser Action make it really easy to publish your Helm Charts securely and reliably. You can use a custom domain to change the default domain to suit your needs and make the Helm Repository easily accessible.
In the next part of this blog series, we're going to set up a GitHub Action Workflow to automatically sign our Helm Charts.