Signing Helm Charts with PGP using the GitHub Releaser Action
This guide will show how you can sign your Helm Charts in an automated way by using the GitHub Releaser Action with a PGP key.

Introduction
Helm Charts are the de facto standard way of packaging and sharing applications in the Kubernetes ecosystem. Because they're so widely distributed and used, they could be a target for hackers. Users therefore should be able to verify the integrity and origin of a published package. This can be achieved by signing a Helm Chart, which basically means providing a provenance file in the Helm Chart.
In this guide, I'll show you how to get your Helm Charts signed automatically by using the GitHub Releaser Action with a PGP key in a GitHub Actions CI-Pipeline.
Important Note
Before we get started, it's important to know that there are two ways to sign Helm Charts and two ways to store and share them: HTTP and OCI. If you're using Helm Charts through HTTP, then you can follow this tutorial.
Prerequisites
To follow this guide you will need the following:
- A GitHub Account
- A Helm Chart Repository hosted on GitHub Pages
Step 1: Create a PGP Key Pair
We'll be protecting the PGP key pair with a strong passphrase later on, so let's get that sorted first:
STRONG_PASSPHRASE=$(tr -dc A-Za-z0-9 </dev/urandom | head -c 32)
echo $STRONG_PASSPHRASEYou can now start generating a key pair using the GPG command:
gpg --full-generate-keyJust follow the prompts to generate an RSA key pair with 4096 bits length and enter the passphrase we created earlier. I'd also suggest setting the expiration date to never for our use case.
The command will also create a user ID with your real name, email address and a comment that you define during the process. In this tutorial, I'll use "Christian Huth" as the user ID.
Step 2: Export & Encode your PGP Key
Once you've got a key pair in your system, you'll need to extract it so you can use it with GitHub and ArtifactHub.
Export the private key in base64 encoded format
gpg --export-secret-keys "Christian Huth" | base64 > private-base64.keyIf you want to, you can get rid of the newline characters in the file you've just created.
tr -d '\n' < private-base64.key > private-base64-oneline.keyExport the public key & fingerprint
Later in this guide, we'll also need the public key and its fingerprint. Let's export this information now already.
The first things we need to do is export the public key to a file called public.key:
gpg --output public.key --armor --export "Christian Huth"Next, we'll get the fingerprint using this command:
gpg --show-keys public.keyThis command will show you all the public keys and their fingerprint in the public.key file. Make sure you copy the one that matches your key pair. It should look something like C87A011F0AB405110B02105534365D9472D7468F.
Step 3: Add GitHub Action Repository Secrets
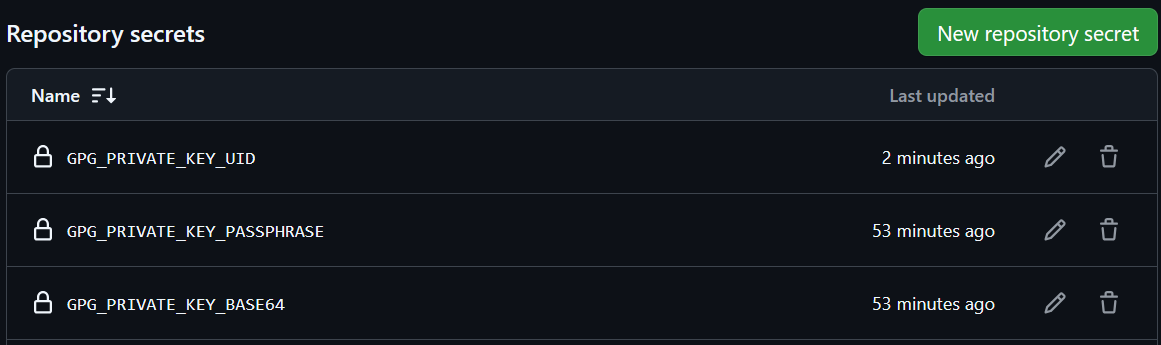
Once you've exported the necessary information, you'll have to add three GitHub Action Repository Secrets:
GPG_PRIVATE_KEY_BASE64: the base64 encoded private keyGPG_PRIVATE_KEY_PASSPHRASE: the passphrase for the private keyGPG_PRIVATE_KEY_UID: the user id of the private key
Navigate to your Git Repository on GitHub, that contains your Helm Charts. Click on Settings > Secrets > Actions. Then click the New repository secret button to create a new secret. Give the secret a name according to the list given above and paste the content into the Value textbox. Click Add secret to save it. Once done you should have three new repository secrets:
Step 4: Create or adjust the GitHub Actions Pipeline
In the Git Repository containing your Helm Charts add a workflow file that uses the Chart Releaser action. A minimal example could look like this:
# chart-releaser.yaml
name: Release Charts

on:
  push:
    branches:
      - main

jobs:
  release:
    runs-on: ubuntu-latest
    steps:
      - name: Checkout
        uses: actions/checkout@v4
        with:
          fetch-depth: 0

      - name: Configure Git
        run: |
          git config user.name "$GITHUB_ACTOR"
          git config user.email "$GITHUB_ACTOR@users.noreply.github.com"

      - name: Import GPG key
        run: |
          echo "${{ secrets.GPG_PRIVATE_KEY_BASE64 }}" | base64 -d | gpg --dearmor --output keyring.gpg
          echo "${{ secrets.GPG_PRIVATE_KEY_PASSPHRASE }}" > passphrase-file.txt

      - name: Run chart-releaser
        uses: helm/chart-releaser-action@v1.6.0
        env:
          CR_TOKEN: "${{ secrets.GITHUB_TOKEN }}"
          CR_KEY: "${{ secrets.GPG_PRIVATE_KEY_UID }}"
          CR_KEYRING: keyring.gpg
          CR_PASSPHRASE_FILE: passphrase-file.txt
          CR_SIGN: true
This workflow adds the GPG key and the corresponding passphrase you defined as a GitHub Action Repository Secret and uses them in the Chart Releaser Action. Now everything is set up and every push to the Git Repository will result in the Chart Releaser Action packaging and signing your Helm Charts.
You should then see that both the chart (*.tgz) and its associated provenance files (*.prov) are published under Assets in the Releases section of your repository. The screenshot below shows a released Helm Chart and its provenance file from my Helm Repository:

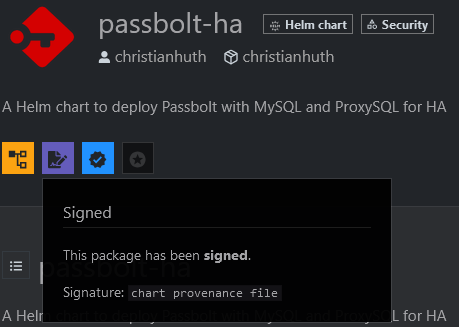
This information will also be displayed on ArtifactHub - the central search database for Cloud Native packages:
Step 5: Publish the public key for ArtifactHub
So far, your Helm Charts contain a provenance file that can be used with Helm to verify the integrity. Beside the provenance file the public key is required to do this. Let's add the information about the public key to our Helm Chart so it will be displayed on ArtifactHub for your users.
To do this, we need to make the public key available via a URL. You can of course use services like keybase.io if you want, but I'll show you an easier way. We're going to use the Helm Repository hosted on GitHub Pages for this.
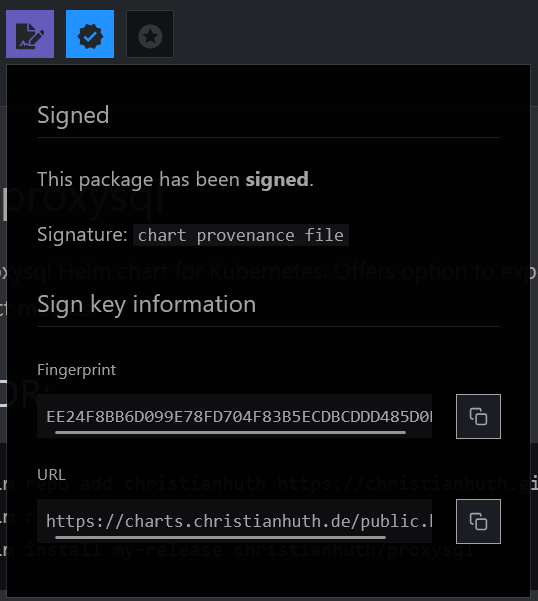
So, just upload the public.key file we have exported earlier to the root folder of the gh-pages branch of your Git Repository. You can find an example of this in my Helm Repository. Now we just have to add the URL of the public key and the fingerprint to the Chart.yaml as an annotation, like shown in the following code snippet:
annotations:
  artifacthub.io/signKey: |
    fingerprint: C87A011F0AB405110B02105534365D9472D7468F
url: https://charts.christianhuth.de/public.key And that's all there is to it! ArtifactHub now shows additional information about the signature of our Helm Charts, which can be used to verify the integrity of the application package.
Bonus Step: validate annotations for ArtifactHub
To be sure that a new version of a Helm Chart doesn't contain any malformed data in the Chart.yaml, we can add a new workflow to the Git Repository that executes the ArtifactHub CLI tool ah - you can find the official documentation about this here.
jobs:
  validate-for-artifacthub:
    runs-on: ubuntu-latest
    container:
      image: artifacthub/ah
      options: --user 1001
    steps:
      - name: Checkout
        uses: actions/checkout@v4

      - name: Run ah lint
        run: ah lint
This workflow checks all the charts' Chart.yaml files and shows an output similar to the one shown here.
------------------------------------------------------------------------------------------------------------------------
✓ proxysql 1.2.2 (charts/proxysql)
------------------------------------------------------------------------------------------------------------------------

Package lint SUCCEEDED!

✓ Name: proxysql
! Display name: *** NOT PROVIDED ***
✓ Version: 1.2.2
✓ App version: 2.6.5
✓ Description: A proxysql Helm chart for Kubernetes. Offers option to expose web interface through Ingress. Uses ServiceMonitor to collect metrics.
! License: *** NOT PROVIDED ***
✓ Logo URL: https://proxysql.com/wp-content/uploads/2019/11/ProxySQL-BIG-e1581368792603.png
✓ Home URL: https://github.com/christianhuth/helm-charts
✓ Deprecated: false
✓ Pre-release: false
✓ Contains security updates: false
! Provider: *** NOT PROVIDED ***
✓ Readme: PROVIDED
! Keywords: *** NOT PROVIDED ***
✓ Links:
  - Name: source | URL: https://github.com/sysown/proxysql
✓ Maintainers:
  - Name: christianhuth | Email: christian@knell.it
✓ Containers images:
  - Name:  | Image: proxysql/proxysql:2.6.5
✓ Changes:
  - Kind: added | Description: signing key to Chart.yaml
! Recommendations: *** NOT PROVIDED ***
! Screenshots: *** NOT PROVIDED ***
✓ Operator: false
✓ Sign key: PROVIDED
✓ Values schema: PROVIDED

------------------------------------------------------------------------------------------------------------------------

26 package(s) found, 0 package(s) with errors
As you can see, every section of a Chart.yaml is checked for any existing problems. In the Sign key section, you can see that we've now provided a key provided that can be used to check the integrity of the Helm Chart.
Conclusion
Following this guide, you'll have a complete automation for signing your Helm Charts using the GitHub Releaser Action. You can check out my Git Repository to see these concepts in action:
 christianhuth
I hope you found this article useful. I'd love to hear your thoughts on this topic. In the next part of this blog series we will learn how to verify the signature of a Helm Chart.
References
- ArtifactHub CLI: https://blog.artifacthub.io/blog/ah-cli/
- GitHub chart-releaser Action: https://github.com/helm/chart-releaser-action
- GitHub issue: https://github.com/helm/chart-releaser-action/issues/94
- My Helm Repository: https://github.com/christianhuth/helm-charts